

Annealage Mesh
Annealage Mesh is an agentic CAD workbench for 3D-printable parts. A 3D viewer and a chat pane sit side by side in the browser, the agent writes CadQuery geometry, and you iterate on the design by pointing at it instead of describing it in words.
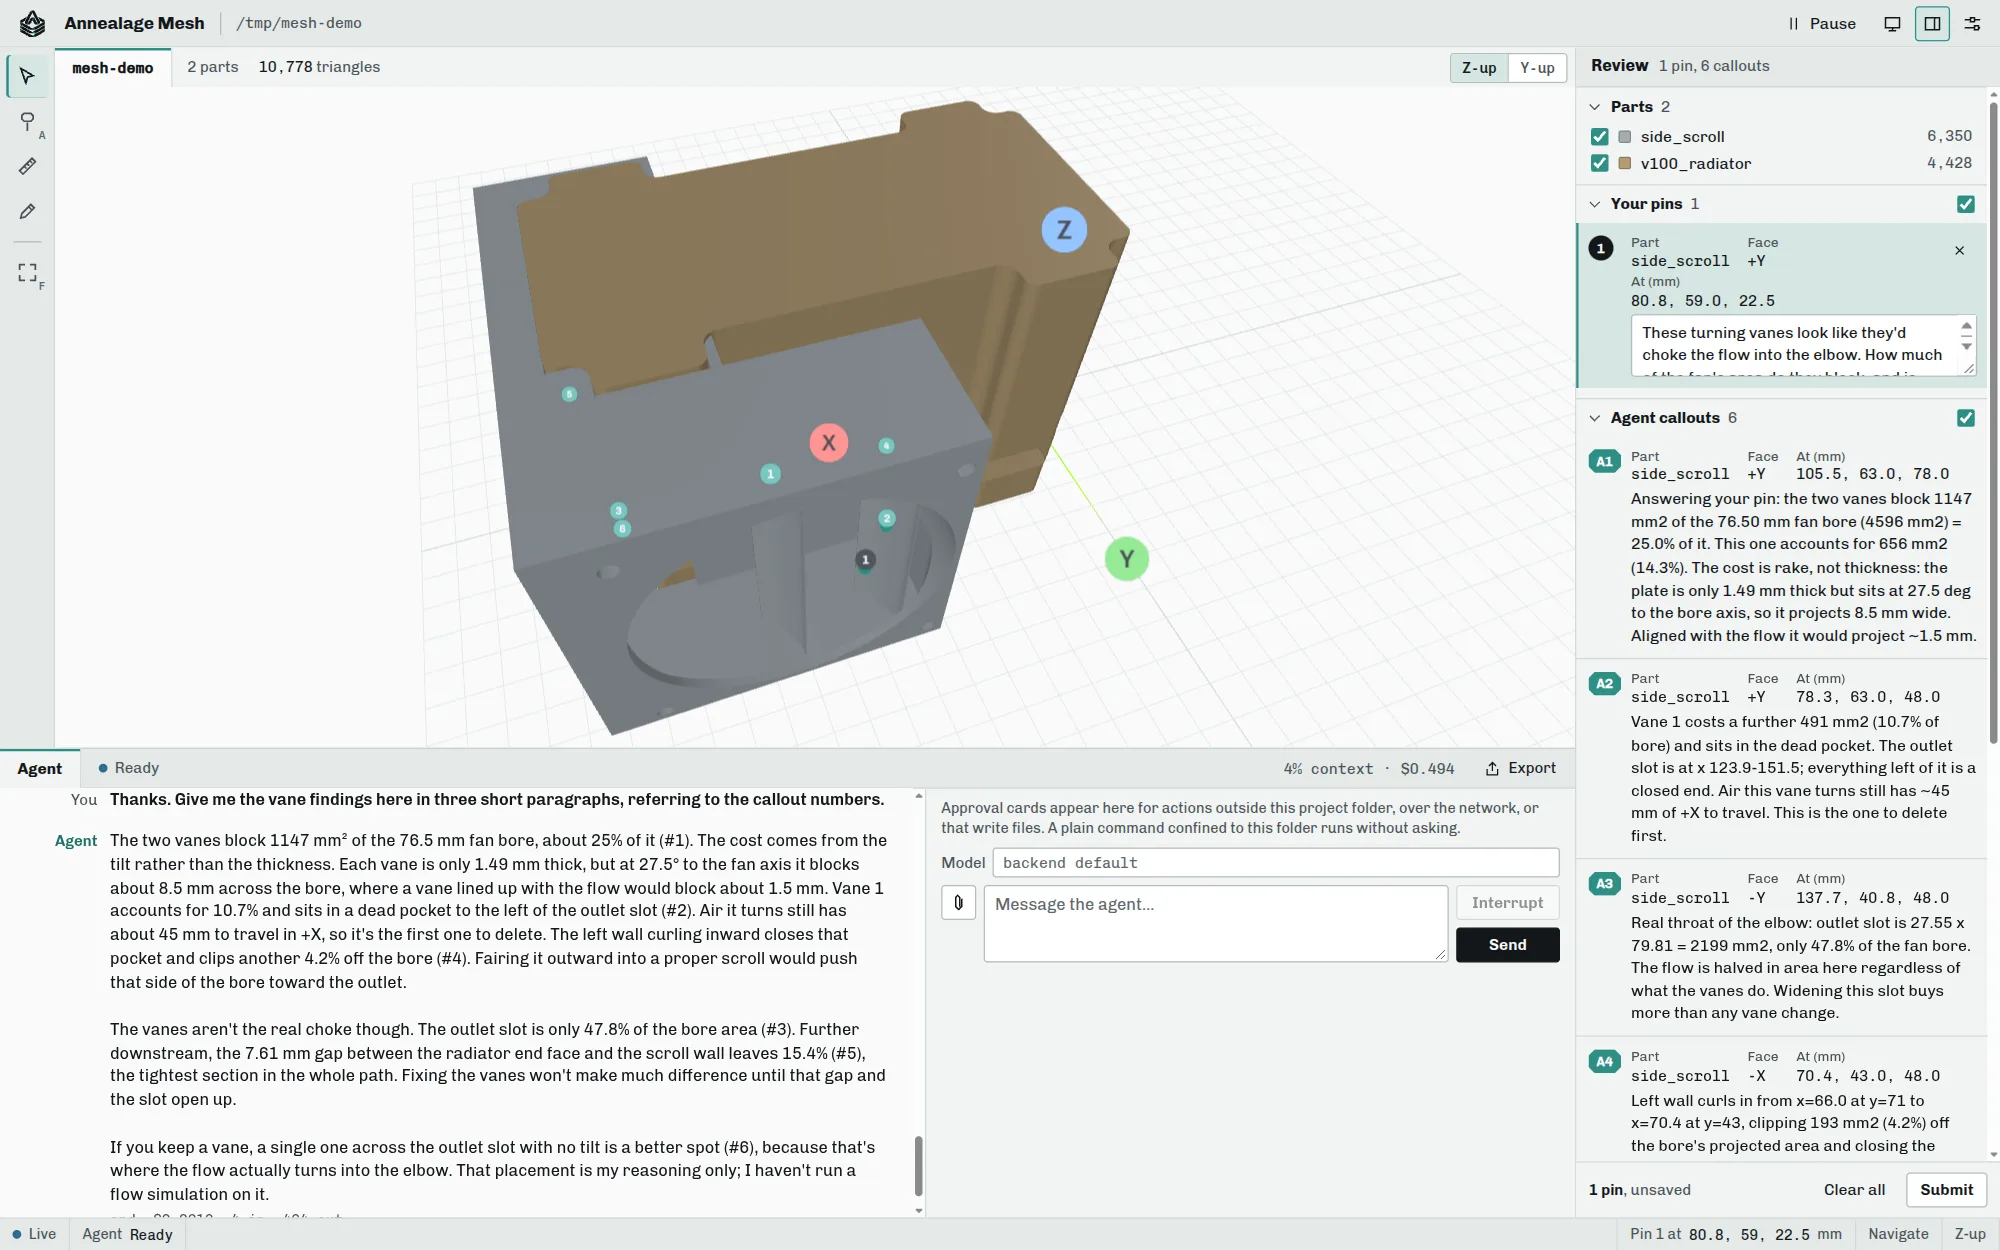
You give it a folder, it scaffolds a parametric CadQuery project and starts a local server. Ask for a part, the agent writes the geometry, and the STL turns up in the viewer within a fraction of a second. Click the face that’s wrong, type what’s wrong with it, and the agent revises the script. The agent pins its own callouts back onto the model, so both sides point at the same geometry.
Install
Section titled “Install”Mesh is on PyPI as
annealage-mesh. With
uv there’s nothing to install first:
uvx annealage-mesh ./path/to/partOr keep it as a tool:
uv tool install annealage-mesh# orpipx install annealage-meshPython 3.10+. three.js is vendored and served locally, so the viewer needs no network access.
On Linux, agent mode also needs bubblewrap and socat, which contain the
agent’s shell. Agent mode won’t start without them rather than run an
uncontained shell. macOS uses its built-in sandbox.
apt install bubblewrap socatAgent backends
Section titled “Agent backends”Three backends, each with the same viewer tools, MCP surface and permission model. With one installed Mesh uses it; with more than one it asks the first time and offers to remember the answer.
- Claude (
--backend claude): the Claude Agent SDK. The SDK bundles the Claude Code CLI, so installing it pulls about 90 MB. - Codex (
--backend codex): OpenAI’s Codex CLI; installopenai-codexseparately. - omp (
--backend omp): Oh My Pi and the providers it supports, including local models; installomp-rpc.
--backend NAME picks one for a run; add --save-default to keep it for every
project.
Point it at a folder:
annealage-mesh ./buildIt sets the folder up if needed (a dimensions.json for caliper measurements, a
model.py scaffold with PEP-723 inline deps for CadQuery, a cad/ directory of
helper scripts, models/ and images/, a CLAUDE.md stub, a .gitignore, and
a git init if git is installed), starts the server, prints the URL with a
per-run token, and opens your browser. Every .stl in the folder shows in the
viewer.
| Command | Does |
|---|---|
annealage-mesh ./build |
Scaffold if needed, serve, start the agent |
annealage-mesh view ./build |
Viewer and chat, no scaffold, no git |
annealage-mesh init ./build |
Set the folder up and stop |
annealage-mesh doctor ./build |
Report what’s installed and configured |
annealage-mesh migrate ./build |
Add the CAD scaffold to an older project |
-c resumes the most recent session for the folder and -r lists them.
Reloading the browser mid-turn loses nothing; the conversation belongs to the
session, not the socket.
The review loop
Section titled “The review loop”- Pins. Switch to Add pin, click the model, type a comment against the
point, and Submit. Pins are written to
mesh-comments.jsonwith the part, the click point and the surface normal in model units. - Callouts. The agent writes its own pins (a point plus a note), shown live in the viewer.
- The viewer is a tool. The agent can move the camera, hide and show parts, capture the view and pin callouts. Pause refuses every view change until you release it; reads keep working.
- Measure. Pick any two placed pins for ΔX/ΔY/ΔZ and the direct distance, drawn in the view.
- Pictures. Attach with the paperclip, paste or drag and drop: a photo of the printed part, a slicer screenshot, a reference drawing. Sketch draws straight on the 3D view and sends that as the picture.
- Export. Writes the conversation into
review/as markdown you can commit. - Phone. The panes become tabs with touch navigation.
--host tailscalebinds your tailnet address instead of loopback. - Settings and theme. The settings button opens port, host, model, backend, effort and viewer preferences, each showing where its value came from (a flag, the project’s config, your settings, or the built-in default). The light/dark toggle in the title bar cycles system, light and dark, and the viewer follows it.
Approvals and containment
Section titled “Approvals and containment”The agent’s shell runs sandboxed, so a command that stays inside the project folder runs without asking. Anything that writes through the edit tools, leaves the folder, or reaches the network arrives as an approval card with the full command or file contents. Allow it, allow it for the session, or deny it with a reason; the reason goes to the agent verbatim.
Viewer tools split by what a mistake would cost. Reading and driving the view
never ask. Writing or deleting a callout, saving a screenshot, and setting a
measured value in dimensions.json do.
If the served folder has its own .claude/settings.json or .mcp.json, Mesh
won’t start the agent until you trust it. Those files can declare hooks, and
hooks are shell commands. Read them, then pass --trust-project-config; the
acceptance is recorded against the exact contents, so a later edit asks again.
Mesh binds to 127.0.0.1 by default. On anything other than loopback the token
in the URL is the only thing between the network and an agent with a shell, so
keep that URL to yourself.
The CAD pipeline
Section titled “The CAD pipeline”- Evidence, then dimensions. Caliper measurements go into
dimensions.json. Derived numbers are computed in the model script. - Scaffold.
model.pyreads that file and runs withuv run model.py, modelling the reference hardware first so the part is placed against real geometry. - Solid checks.
cad/robust_solids.py:safe_fillettries radii largest-first and falls back;assert_validcatches silent boolean failures. - Verify.
cad/section_probe.pyslices the mesh, probes points and checks watertightness; cross-section PNGs go intoimages/. - Print prep. Orientation, splitting hollow parts into open-face trays,
plate layout, and volume-guarded watertight export via
cad/export_watertight.py.
Agents outside the chat pane
Section titled “Agents outside the chat pane”An agent running elsewhere uses two JSON files in the served folder plus a few MCP tools.
Read the human’s pins from mesh-comments.json:
{ "annotations": [ { "id": 1, "part": "side_scroll", "point": [107.01, 59.44, 68.18], "normal": [0.659, 0.752, 0], "comment": "these vanes look like they'd choke the flow" } ]}Write callouts to mesh-callouts.json and they appear in the viewer live:
{ "annotations": [ { "id": 4, "author": "agent", "part": "side_scroll", "point": [70.4, 43.0, 48.0], "comment": "left wall curls in here and clips the bore" } ]}point is in model space, the same units as the STL. The MCP tools
mesh_verify (STL quality check), mesh_dimensions (read dimensions.json)
and mesh_dimensions_set (write a measured value, with approval) complement the
file contract. A skill in the repo’s skill/ directory wires this up for agents
that support skill files.
Licence
Section titled “Licence”PolyForm Noncommercial 1.0.0:
free for any non-commercial use. Commercial use needs a separate licence (see
COMMERCIAL.md in the repo). The bundled skill and the vendored three.js are MIT.
Source: github.com/Annealage/mesh. The
repo’s docs/user-guide.md has the full walkthrough.